HTML Code Editor Installation

Before diving into HTML coding, it's essential to set up a reliable code editor. A code editor simplifies the process of writing, editing, and organizing your HTML code. Various code editors are available, but one of the most popular and versatile choices is Visual Studio Code (VS Code). Follow the steps below to install it on your system:
- Visit the official Visual Studio Code website at https://code.visualstudio.com/.
- Download the installer suitable for your operating system (Windows, macOS, or Linux).
- Once the download is complete, run the installer and follow the installation instructions provided by the setup wizard.
- After successful installation, launch Visual Studio Code to start creating and editing your HTML files.
Prerequisites to Learning HTML
Before you start learning HTML, it's beneficial to have a basic understanding of the following concepts:
- Familiarity with using a computer and basic software applications.
- Understanding how web pages work and basic internet browsing skills.
- A fundamental understanding of text editing and basic coding concepts.
- A keen interest in learning the structure and syntax of HTML.
Tools Needed to Make an HTML Page
To create an HTML page effectively, you'll need the following tools:
- A reliable code editor, such as Visual Studio Code, for writing and editing HTML code.
- A web browser, like Google Chrome, Mozilla Firefox, or Safari, for viewing and testing your HTML web pages.
- Optional: a live server extension for real-time preview and debugging of your HTML code.
Installation & Setup of Visual Studio Code for HTML
Follow these steps to set up Visual Studio Code for HTML development:
- Open Visual Studio Code after installation.
- Install the necessary extensions for HTML development. Go to the Extensions sidebar (Ctrl+Shift+X or Cmd+Shift+X) and search for the "HTML" extension. Install it to enable HTML language support.
- Optionally, you can install the "Live Server" extension for real-time previewing of your HTML web pages. Search for the "Live Server" extension and install it to enable the live server feature.
- Configure the Visual Studio Code settings to customize your coding environment according to your preferences.
What is the Live Server Extension?
The "Live Server" extension is a Visual Studio Code extension that allows you to launch a local development server to preview your web pages in real-time. It eliminates the need to manually refresh your browser whenever you make changes to your HTML, CSS, or JavaScript files. With "Live Server," you can see the updates instantly without leaving your code editor.
How to Install the Live Server Extension
To install the "Live Server" extension, follow these steps:
- Open Visual Studio Code.
- Go to the Extensions sidebar by clicking the square icon on the sidebar or pressing Ctrl+Shift+X (or Cmd+Shift+X on macOS).
- In the search bar at the top, type "Live Server."
- The "Live Server" extension by Ritwick Dey should appear in the search results. Click the "Install" button to install the extension.
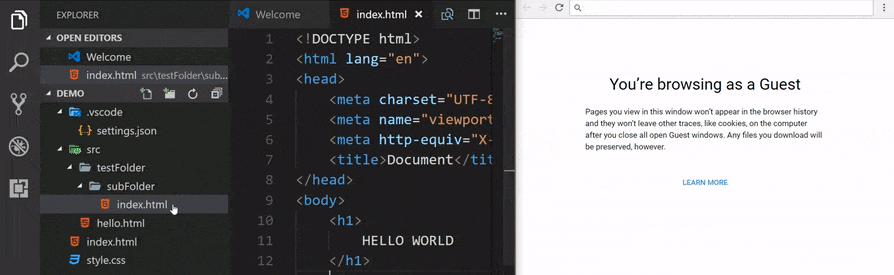
How to Use the Live Server Extension
Once you've installed the "Live Server" extension, you can use it to launch a live server for your HTML files:
- Open the HTML file you want to work on in Visual Studio Code.
- Right-click anywhere in the HTML file or use the shortcut menu (right-click), and you'll see an option to "Open with Live Server." Click on it.
- Visual Studio Code will open a new browser window or tab, displaying your HTML file. Any changes you make to your HTML, CSS, or JavaScript files will be automatically reflected in the browser without the need to manually refresh the page.
- To stop the live server, you can click the "Go Live" button at the bottom right of the Visual Studio Code window or right-click the HTML file and select "Stop Live Server."
Creating Your First Website for Verification Setup
Now that you have set up your HTML code editor, you can create your first HTML website. Follow these steps to create a simple HTML page:
- Open Visual Studio Code and create a new file with the ".html" extension (ex.
index.html). - Write the basic HTML structure, including the
<!DOCTYPE>declaration,<html>,<head>, and<body>tags. - Add some content within the
<body>tags, such as headings, paragraphs, and images, to build your web page. - Save the file with an appropriate name and the ".html" extension.
- Launch the live server extension if you installed it, and open your HTML file in a web browser to verify the setup.
<!DOCTYPE html>
<html>
<head>
    <title>My First Website</title>
</head>
<body>
    <h1>Welcome to My First Website</h1>
    <p>This is a paragraph of text on my first web page.</p>
</body>
</html>
Welcome to My First Website
This is a paragraph of text on my first web page.
By following these steps, you'll have a solid foundation for creating and editing HTML web pages using Visual Studio Code. With the live server extension, you can instantly see the changes you make in your HTML code, making the development process more efficient and productive.